In Melbourne, cake aficionados can go to the Brunetti or Monarch cake shops to satisfy their passion. There they are confronted with 'torte heaven' and a visual and taste experience to remember. However, you don't have to be in Melbourne to delight in the joys of a torte. You can create this magnificent Malakoff Torte and we will even reveal how it can be achieved without using an oven!
The Malakoff Torte was created during the Crimean War to celebrate the French Maréchal Pélissier's victory storming the tower of Malakoff which brought the Siege of Sevastapol to an end. Pélissier was rewarded with the title of first (and last) Duc de Malakoff and a magnificent torte was whipped up for the occasion, without the use of an oven.
For our endeavour it's easiest to use an oven, but we will mention how it can be done without one so as to recreate an authentic Malakoff Torte. The beauty of this cake is that it is has all the attractions of a torte but is achievable for novice or very busy cooks. At the end, we'll also demonstrate how the skills you've learnt making the Malakoff Torte can be easily used to make other tortes, as well as how you can decorate them in spectacular fashion.
Malakoff Torte
The Base
1/4 cup flour
40g corn flour
1/8 cup cocoa
2 large or 3 small eggs
60g sugar
1 tsp vanilla sugar
small pinch of salt
35g hot melted butter
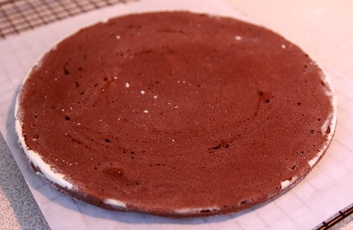
Pre-heat oven to 180 degrees Celcius. If necessary, grease a 24cm spring form cake pan with butter and sprinkle with flour. (This shouldn't be necessary with a non-stick pan, but it never hurts.)
Mix the two flours with the cocoa and sift. Cream the eggs, sugars, and salt until fluffy. Fold in flour mixture. Gently mix in hot butter.
Pour into pan, spreading the mix to the sides evenly. Bake for around 30 minutes. (If you want to be super authentic or your oven breaks down - yes, this does happen! - bake it in a fry pan over very low heat with a lid.) As soon as it is cooked, sprinkle the top with flour or sugar and invert onto baking paper on a cooling rack. When cool, cut off the edge up to a centimetre wide. (This is not necessary if you don't intend to cover/decorate the sides.)
The Syrup
Whether you use layers of cake or off-the-shelf biscuits, it's best if they are softened with an alcoholic beverage such as brandy, rum, or sherry, ideally using a sugar syrup. When an alcohol-free cake is required, use brandy or rum essence instead or omit completely.
Bring 50ml of water to the boil with 50g of sugar until dissolved. Chill, then stir in 50ml of brandy or rum.
The Biscuit Layer
We simply bought a packet of Savoiardi (ladyfinger) biscuits from the supermarket. If you can't find them or feel particularly motivated you can make your own, but you shouldn't feel any guilt whatsoever if you don't. Our guess is that the creators or the Malakoff Torte probably used old biscuits from a tin.
The Cream Filling
15g powdered gelatin soaked in 85ml milk
75 ml strong coffee
150 ml milk
pinch of salt
3 eggs
60g castor sugar
300ml cream (whipped)
Prepare the gelatin and coffee. Separate eggs. Add the sugar to the yolks and whisk until creamy. Gently warm the milk and coffee so that it is warm but not hot. Add to the egg mixture and whisk over heat until almost too hot to touch (c. 65-70 degrees), being careful not to scramble the eggs. (If you do, put the mixture through a sieve. It's not the end of the world.) Add the gelatin mixture and whisk. Cool. The mixture should be no warmer than lukewarm. If you haven't whipped your cream, this is a good time to do so. Then whip the egg whites. At the last moment before assembling your cake, add the coffee mixture to the whipped cream and mix, then gently whisk in the egg whites. If unavoidably interrupted, put the mixture in the fridge so it doesn't run everywhere.
1/4 cup flour
40g corn flour
1/8 cup cocoa
2 large or 3 small eggs
60g sugar
1 tsp vanilla sugar
small pinch of salt
35g hot melted butter
Pre-heat oven to 180 degrees Celcius. If necessary, grease a 24cm spring form cake pan with butter and sprinkle with flour. (This shouldn't be necessary with a non-stick pan, but it never hurts.)
Mix the two flours with the cocoa and sift. Cream the eggs, sugars, and salt until fluffy. Fold in flour mixture. Gently mix in hot butter.
Pour into pan, spreading the mix to the sides evenly. Bake for around 30 minutes. (If you want to be super authentic or your oven breaks down - yes, this does happen! - bake it in a fry pan over very low heat with a lid.) As soon as it is cooked, sprinkle the top with flour or sugar and invert onto baking paper on a cooling rack. When cool, cut off the edge up to a centimetre wide. (This is not necessary if you don't intend to cover/decorate the sides.)
The Syrup
Whether you use layers of cake or off-the-shelf biscuits, it's best if they are softened with an alcoholic beverage such as brandy, rum, or sherry, ideally using a sugar syrup. When an alcohol-free cake is required, use brandy or rum essence instead or omit completely.
Bring 50ml of water to the boil with 50g of sugar until dissolved. Chill, then stir in 50ml of brandy or rum.
The Biscuit Layer
We simply bought a packet of Savoiardi (ladyfinger) biscuits from the supermarket. If you can't find them or feel particularly motivated you can make your own, but you shouldn't feel any guilt whatsoever if you don't. Our guess is that the creators or the Malakoff Torte probably used old biscuits from a tin.
The Cream Filling
15g powdered gelatin soaked in 85ml milk
75 ml strong coffee
150 ml milk
pinch of salt
3 eggs
60g castor sugar
300ml cream (whipped)
Prepare the gelatin and coffee. Separate eggs. Add the sugar to the yolks and whisk until creamy. Gently warm the milk and coffee so that it is warm but not hot. Add to the egg mixture and whisk over heat until almost too hot to touch (c. 65-70 degrees), being careful not to scramble the eggs. (If you do, put the mixture through a sieve. It's not the end of the world.) Add the gelatin mixture and whisk. Cool. The mixture should be no warmer than lukewarm. If you haven't whipped your cream, this is a good time to do so. Then whip the egg whites. At the last moment before assembling your cake, add the coffee mixture to the whipped cream and mix, then gently whisk in the egg whites. If unavoidably interrupted, put the mixture in the fridge so it doesn't run everywhere.
Assembling the Torte
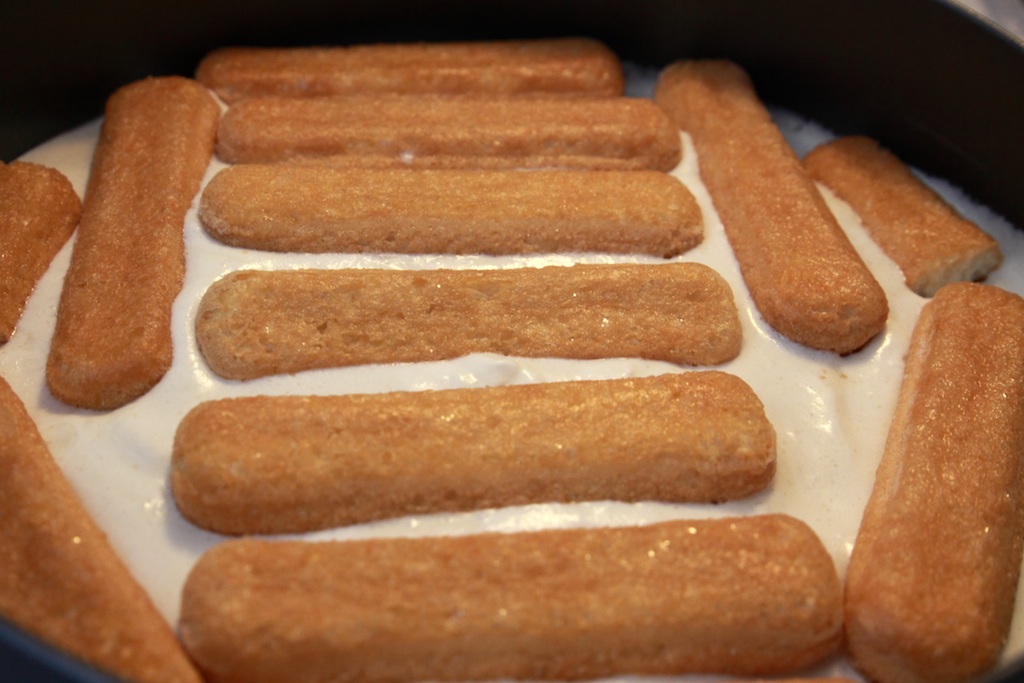
Take your spring form pan and remove the base. Place it on a board or flat dish. Ensure that you have all your 'components' ready as it is important to assemble the torte fairly quickly.
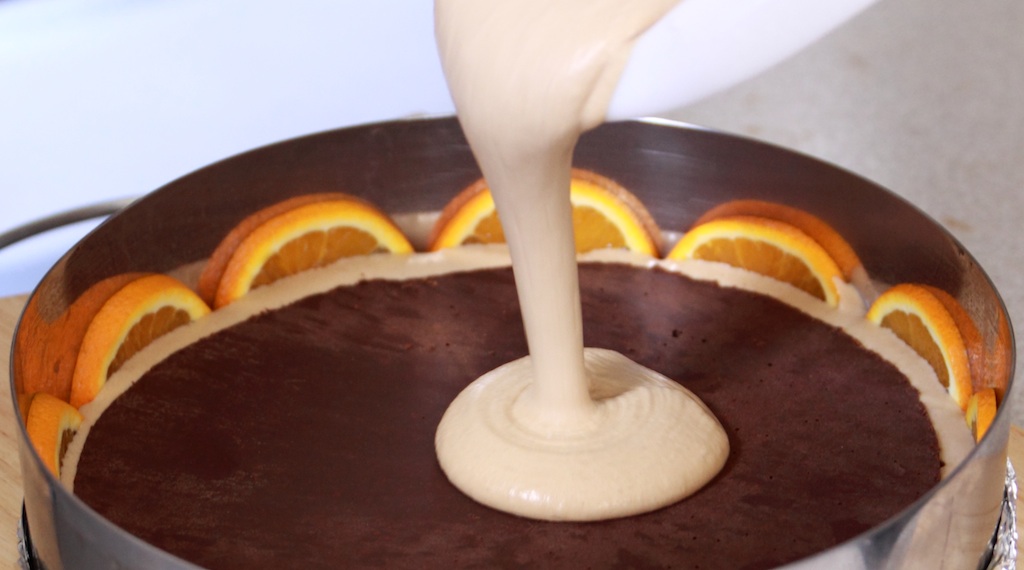
First, place the base inside the ring and brush with the sugar syrup. Pour in a layer of coffee cream and spread evenly to the edges. Then add a layer of Savoiardi biscuits, brushing each one on the flat side before laying them down flat side up. Repeat with coffee cream and remaining biscuits. Finally, cover the torte with the remaining cream. Refrigerate (or even freeze). If you freeze the torte, allow a couple of hours for it to thaw before serving.
Finishing Touches
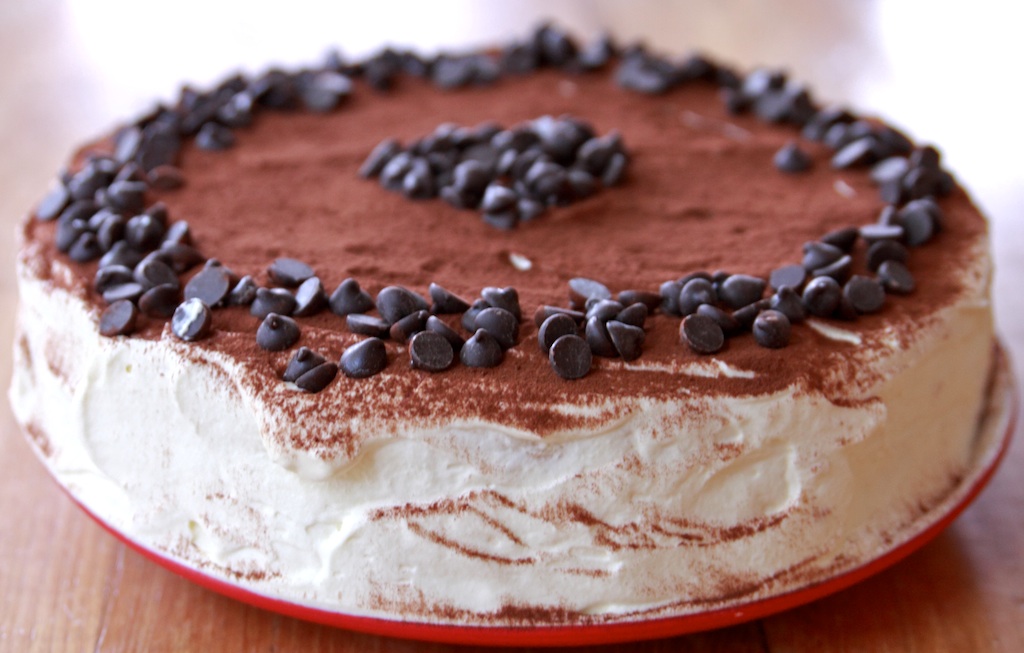
Cover the entire torte with 300ml of whipped cream. Dust with cocoa and sprinkle dark chocolate buds on top. Alternatively, dip Savoiardi biscuits two-thirds in dark chocolate and arrange in spoke-like fashion, or fashion your own decorations using dark chocolate.
Keep refrigerated. Best served 12 - 24 hours after making.
Creating Your Own Torte
The Base and Layers
Use the basic base recipe from the Malakoff Torte to create the base and cake layers for your torte. Depending on how tall a cake you want, you'll need to double or triple the ingredients.
Experiment with different flavours. For example, substitute the cocoa with the same amount of flour plus an essence such as almond or rum, or add the zest of half a lemon or orange.
Likewise, with the cream layers, substitute the coffee and make a lemon, strawberry, or chocolate cream instead.
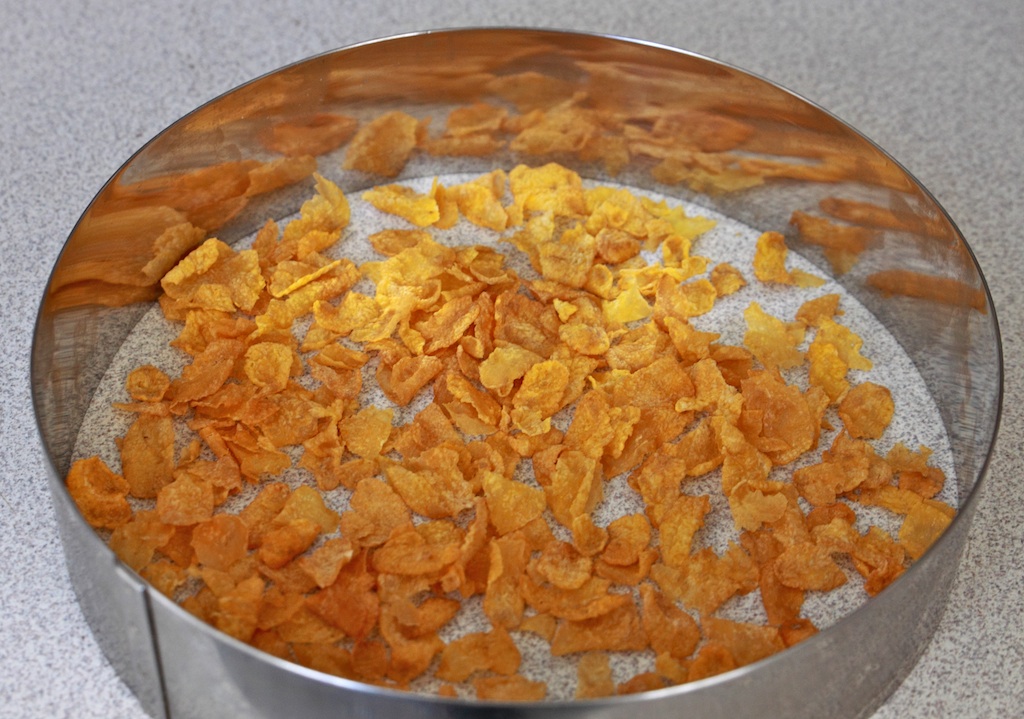
Chocolate Crunch
Another option is to create an extra layer of chocolate crunch in the middle. It's as simple as adding melted chocolate to either rice bubbles or crushed corn flakes, rolling it between baking paper, letting it set, and cutting out a disc slightly smaller than your cake ring. Measure the amount of crunchy cereal by placing it in a layer inside your cake ring, using more or less according to your preference. We added approximately 100g of melted chocolate.
Use the basic base recipe from the Malakoff Torte to create the base and cake layers for your torte. Depending on how tall a cake you want, you'll need to double or triple the ingredients.
Experiment with different flavours. For example, substitute the cocoa with the same amount of flour plus an essence such as almond or rum, or add the zest of half a lemon or orange.
Likewise, with the cream layers, substitute the coffee and make a lemon, strawberry, or chocolate cream instead.
Chocolate Crunch
Another option is to create an extra layer of chocolate crunch in the middle. It's as simple as adding melted chocolate to either rice bubbles or crushed corn flakes, rolling it between baking paper, letting it set, and cutting out a disc slightly smaller than your cake ring. Measure the amount of crunchy cereal by placing it in a layer inside your cake ring, using more or less according to your preference. We added approximately 100g of melted chocolate.


Top and Sides
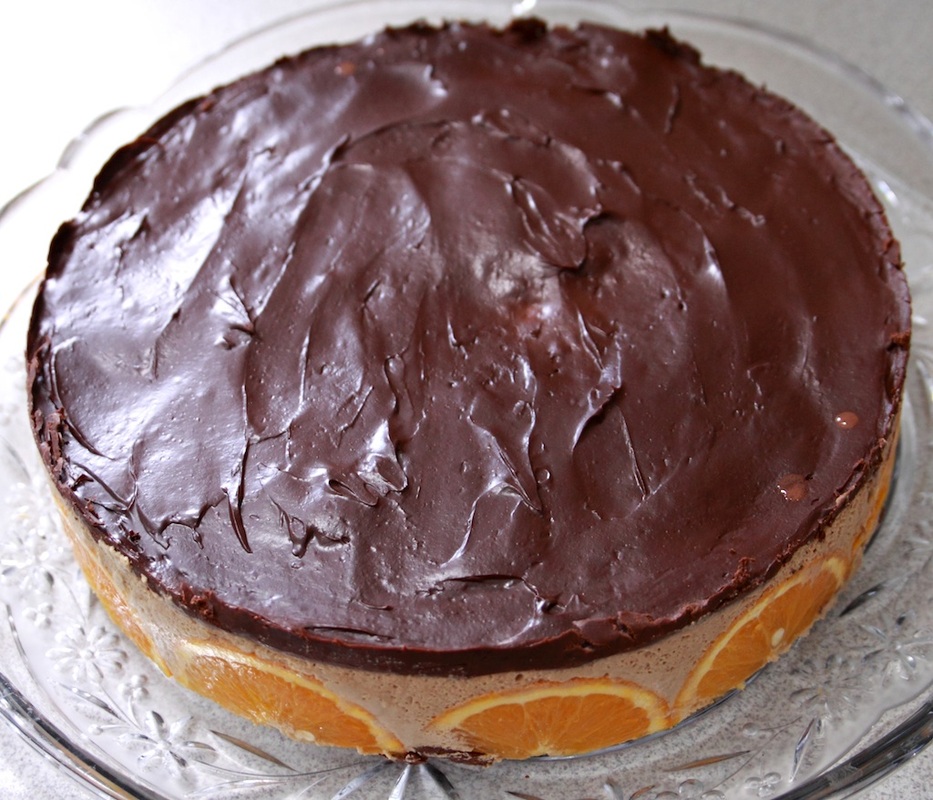
Whipped cream is far from the only option when it comes to the top layer of your torte. Cakes look fabulous glazed with jam, especially if they're fruit flavoured. Chocolate or coffee tortes can be finished off with a thin layer of melted chocolate or a chocolate ganache (which is softer). Both can also be used on the sides.
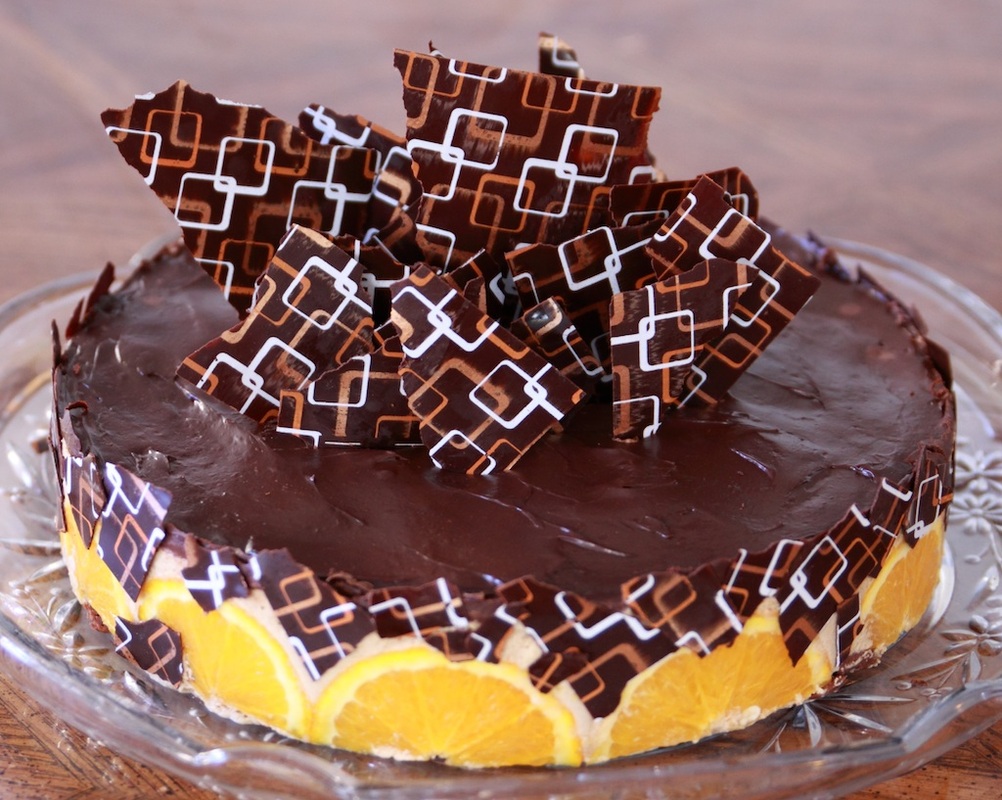
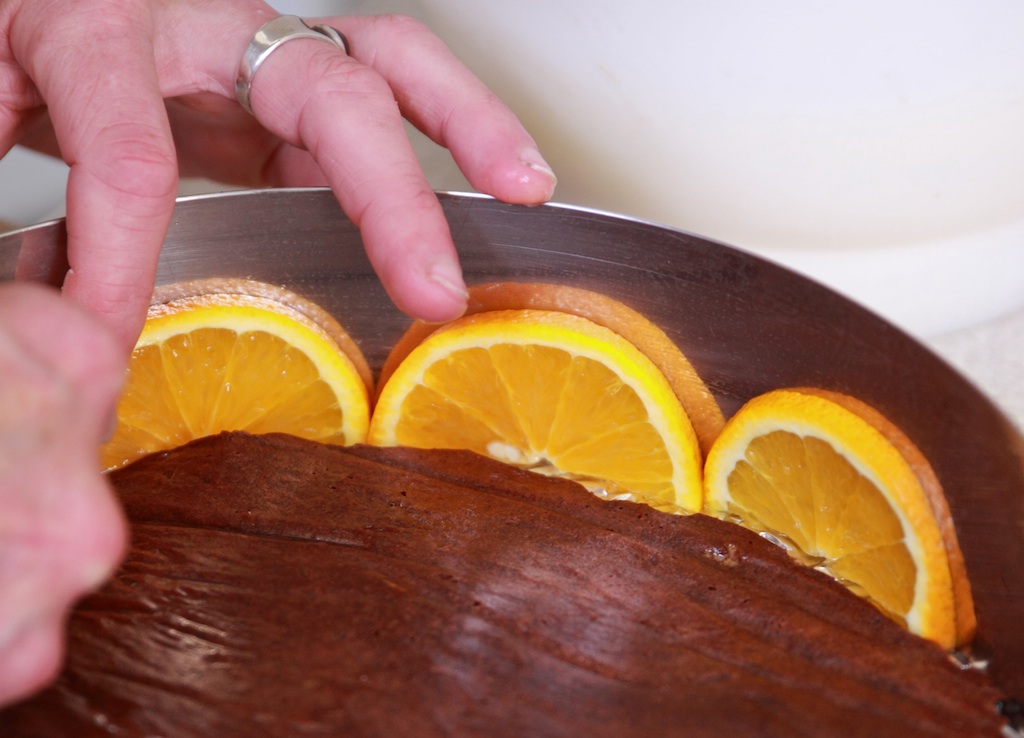
Orange slices and other fruit are an easy way of adding pizzazz to your torte, but almost anything edible can be used to line the sides. This is far from necessary, but it's a great way of adding a personal touch, especially if the cake's for someone special and you use something you know they particularly love. The cake we made below had the additional chocolate crunch as well as the orange slices and chocolate ganache topping.
Chocolate Ganache
220g dark chocolate
165 ml cream
Combine chocolate and cream in a heatproof bowl over a saucepan of simmering water. Stir until smooth. Remove from heat. Allow to cool, stirring occasionally until ganache is thick and spreadable.
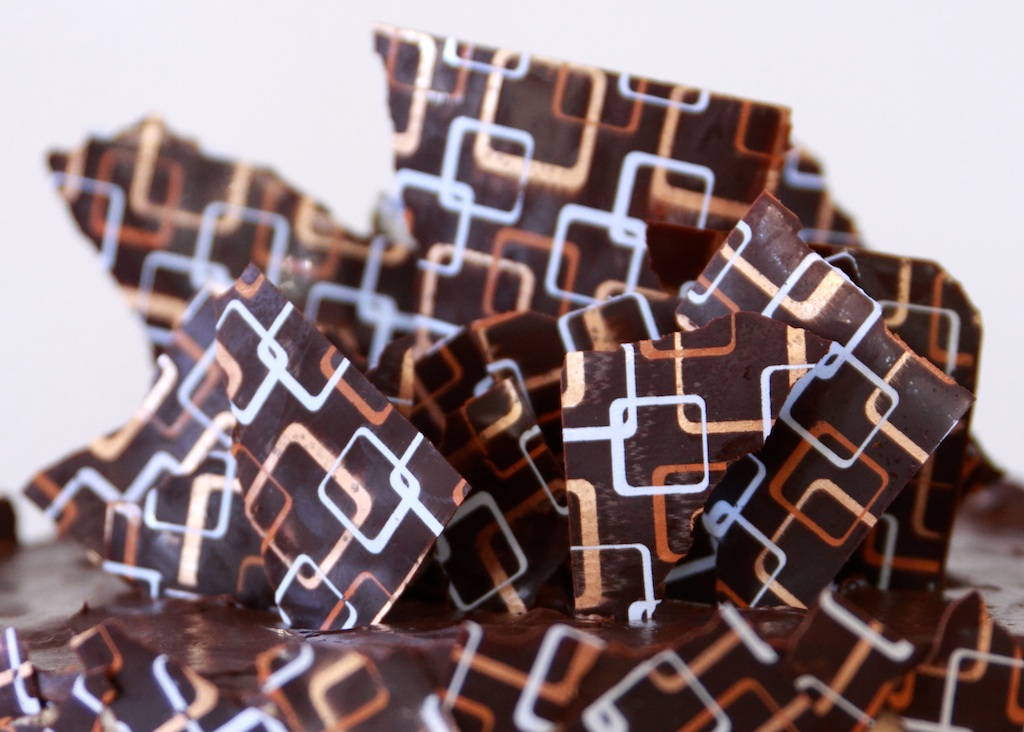
Chocolate Stencils
Chocolate stencils can be easily purchased, but you may have to ask. They're often a 'behind the counter' item as they're mostly used by professionals. We purchased ours at Cocobean in Launceston.
Using them is a matter of spreading melted chocolate in a thin layer and allowing it to cool (in the refrigerator if necessary) before breaking or cutting into pieces and using them to decorate your cake however you want. Your imagination is the limit. We broke ours into shards and stuck them in the middle of the cake creating what was later dubbed a 'Sydney Opera House effect'. This is a great way of decorating a cake, especially if you want a modern or masculine effect or are tired of piped roses and flowers.
 RSS Feed